Sunday, August 18, 2013

Tiramisu serger dress

Another quick knit project, constructed mainly on my serger. Knits really are great for instant gratification! I downloaded and pieced together the pattern yesterday morning, and today the dress is mainly completed (I still have to let the dress hang a day before I hem it since the skirt is on the bias).

The pattern is the Tiramisu dress from Cake Patterns. The way that the pattern is constructed is really neat: It has a modular design where you choose your top pattern piece based on your high and full bust measurements (in my case a 35 D), your skirt piece based on your waist measurement (35), and then draw your own custom waistband piece based on the top and bottom sizes that you've selected. Designing patterns this way just makes so much sense, because it builds in the assumption that bodies vary and your hip measurement can't necessarily be inferred from your bust measurement (or vice versa). I'm quite comfortable making alterations to "standard" patterns myself (and probably mess with patterns more than I should, really), but I think that many sewists would feel more comfortable working with a pattern like this where you're essentially making some basic alterations just by choosing different pattern pieces. As a result of this nifty design, the pattern is wearable for me with no alterations (!!). It helps of course that the pattern is a knit (adding fit forgiveness) and has kimono sleeves (so no need to adjust the shoulder seam, which is often a problem for me).

The instructions are generally quite good, but one thing that I did change was to bind the armholes after sewing up the side seams, rather than doing the binding first as the instructions suggest. Attaching the binding in the round is only marginally more time consuming than doing it flat, and it gives a better finish so that you don't have the side seam poking out the bottom of the arm hole. I'm also still not terribly happy with the way the neckline turned out. The pattern piece for the neckline binding is eased into the neckline a bit, and I turned up the differential feed on my serger to snug it up even more, but after topstitching the binding (with a zig zag stitch and a walking foot) it still looks a little stretched out. I'll probably shorten the binding piece even more and increase the stitch length on the topstitch the next time I make this pattern, and hopefully that should help. I might also consider just eliminating the stretch from the neckline entirely by using some stay tape.

The fabric that I used for this pattern is a polyester sweater-ish knit from Fabricville -- not the type of fabric that I would ordinarily gravitate towards, but the print really jumped out at me. The directional lines in the print work really well for the bias cuts in this dress. I like this pattern enough that I can see making it again in a more expensive fabric like a silk jersey. If I could manage to find a nice printed silk jersey, this would be a great pattern to make a DVF inspired faux-wrap dress!

Friday, June 28, 2013

Marimekko pants

I'll just start off by saying that I recognize these pants are a little insane. In my head these were going to be just a little funky and mostly fabulous, but as I got further and further into them I realized they were not quite what I intended. These are made from a fabric remnant I got at the Marimekko store while I was recently in Vancouver, and while I was sitting in the hotel room with the fabric draped over my lap, I thought -- pants! Printed pants are all over the place right now, and what could be better than Marimekko printed pants? The scale of the print is probably too big for pants, though, and the fact that I had a veeeerrry small piece of fabric and had essentially no choice about pattern placement also didn't help. Midway through sewing them, the SO started singing "Funky Pants" (to the tune of Funky Town) whenever I went to go work on them. The final shot to my confidence in the Marimekko pants project came when my sewing/running buddy affectionately told me that if I wore these to teach I would probably be known as Professor CrazyPants. There are probably worse things to be known for in academia, but suffice it to say I've decided these will probably remain weekend pants.
On the plus side, this is now the third pair of bottoms that I've sewn recently using my digital pants sloper, and the fit is really pretty good now. The first attempt I made at sewing something using that sloper was in a linen fabric that just stretched endlessly when I tried to sew it, and in my frustration with that project I never managed to get around to picking the sloper pattern back up again. Maybe one more pair of pants is in order, this time in a more sedate fabric!

Sunday, May 5, 2013

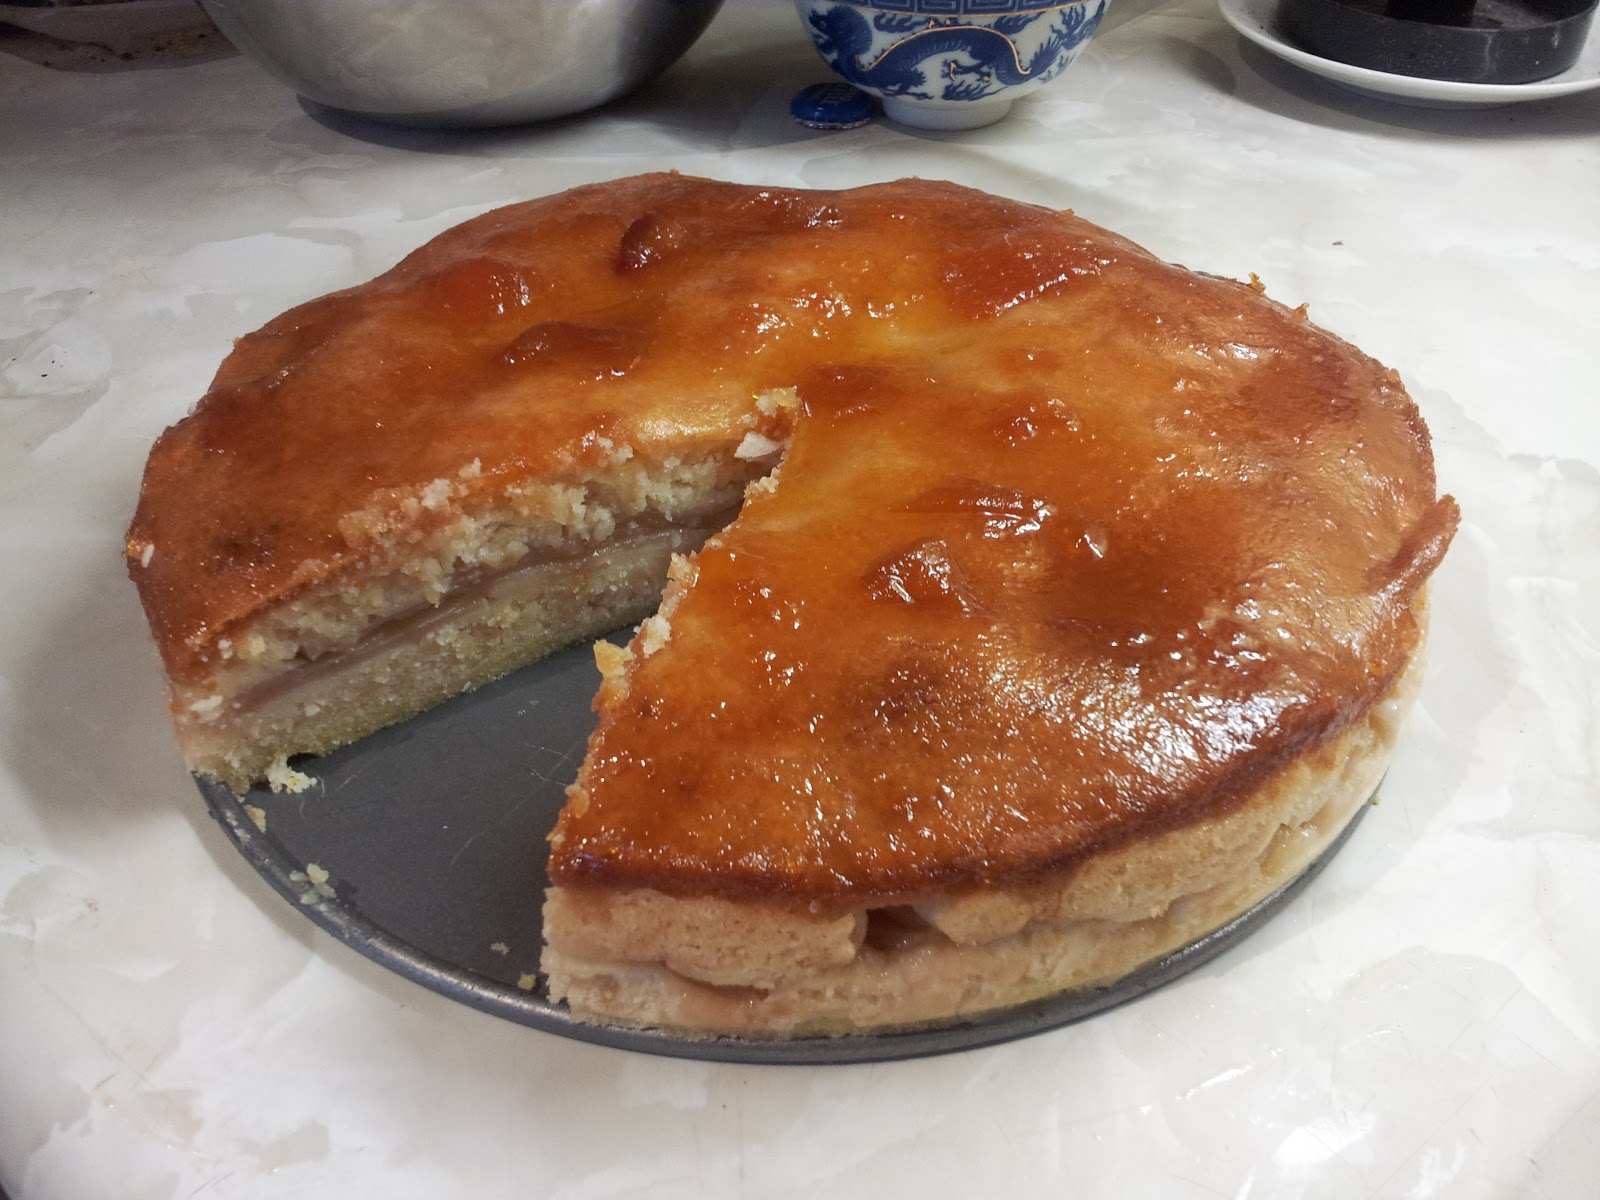
Vegan apple marzipan cake

This cake has come to be known in our household as the SO's birthday cake, because he loves but it's labor intensive enough that I only make it for special occasions (ie, his birthday). The most fabulous bit about this cake is the thin layer of marzipan rolled out over the top and glazed with apricot jam and rum right after it comes out of the oven. Yum!

The recipe came to me from the SO's mother, and before that from a German vegan listserv. We translated the recipe (which is not as straightforward as you might think since there are several staples of German baking--such as pre-measured baking powder packets and sugar mixed with vanilla extract--that are not available over here) and I've tweaked it a bit over the years. I haven't seen anything similar on any of the vegan blogs I frequent, so I'll share the recipe here.

Apple marzipan cake

For the crust:
1 1/3 c flour
1/3 c margarine
1/3 c sugar
3 tbsp water

For the filling:
1/2 c sugar
1/2 c margarine
1 tsp vanilla
1 tbsp rum
10 drops lemon extract
pinch salt
1/4 c soy (or almond) milk
1 3/4 c flour
2 tsp baking powder
4 medium apples, peeled and finely sliced

For the topping:
150g marzipan
2 tbsp apricot jam
1 tbsp rum

1. Mix all ingredients together for the crust, and store in the fridge in plastic wrap to chill before rolling out.
2. Roll out crust to 1/4 inch thick and place at the bottom of a greased springform pan.
3. Cream margarine and sugar, vanilla, run, lemon extract, and salt together for the filling batter. Blend in soy milk and then sift flour and baking powder into the wet ingredients (note that the batter ends up very thick, sometimes I add a bit more soy milk if it's too thick to spread easily).
4. Spread half of this batter over the crust. Arrange the sliced apples on top of the batter, and then spread the remainder of the batter on top.
5. Knead the marzipan and roll out into a thin layer, spread out on top of the cake and pat it down.
6. Bake the cake for 40 min at 350F.
7. Immediately after the cake comes out of the oven, spread the apricot jam and rum mixture on top of the marzipan crust, and allow the cake to cool.


Sunday, April 21, 2013

A cord jacket for my SO


Doesn't he look smashing? Like so many of my projects, this one has been a long time in the making. I think the SO started asking me for a cord jacket back when we first moved in together, and I bought the fabric (for a song!) in Ithaca at SewGreen. When we went to visit the SO's parents last summer I found the perfect pattern for the jacket in a set of Burdas that were gifted me by one of my mother-in-law's friends (a retired seamstress), and I think I first started tracing and muslining the pattern sometime in July or August.


Fitting the jacket was actually quite easy -- I don't know if that's because menswear is easier to fit in general since it has fewer curves to accommodate, or if it's just easier to do fitting on someone else. I lengthened the sleeves quite substantially (more than two inches, I think), which is not surprising considering that the SO often has problems with arm length in clothes. I also took a tuck out of the back at the shoulder seam, essentially increasing the slope of the shoulder line but on the back piece only and not the front. Don't ask me why this worked, it seems bizarre to me. But I guess the advantage of doing pin fitting is that you don't really have to know the whys and hows of pattern alternation, you just take out extra fabric where you see it. I also nipped the jacket in at the back waist a bit along the two seam lines.


Actually constructing the jacket was in.credibly. time consuming. This was partially my fault, because I did all of the tailoring by hand -- many many hours of padstitching went into that collar (much of which I did somewhat passive aggressively while sitting with the SO on the couch, so that he could see exactly how much hand work I was putting in). The SO wears his clothes forever, though, so I figured it was worth it so that I wouldn't be looking at a floppy collar five years from now and feeling annoyed that I hadn't built it to last. The other time consuming aspect was working with the cord fabric. You have to take the directionality of the fabric into account (more than one piece had to be cut a second time when I realized I'd cut the piece with the nap in the wrong direction), you have to press it carefully to avoid flattening the cord, and the nap also meant that the pieces sometimes had a mind of their own when I was sewing them right sides together. It took me until about November to assemble the main body of the jacket and padstitch the collar, and then it was put aside for a bit while I worked on some Christmas presents.


I slowly picked away at it during the winter, in between other projects, and by the end of March I was able to put the finishing touches on it right before we went away for a trip over Easter weekend.

The buttons for the jacket were rather pricey, partially because I bought them at the lovely but not at all cheap Britex Fabrics, and partially because there was no way I was putting cheap plasticky buttons on this jacket after all the work I'd put into it. Many of the non-plastic button options that matched this green/brown/grey tones of the jacket were made of horn or bone, which seemed wrong for a jacket made for a vegan, so I opted for these buttons made out of a beautiful dark tropical wood.


I actually bought two lining fabrics for this jacket -- the first was a solid color that just seemed too boring, so I searched a bit more and came up with this floral paisley fabric. Much better! I also added an inside pocket to the jacket lining, which I was sorely tempted to skip because I was getting sick of working on the jacket by that point. The SO says that the extra pocket is quite useful, though, so I'm glad that went to the trouble of adding it. I drafted the lining with an ease pleat in the back, but I didn't add any vertical ease to the lining and I think that this was a mistake. Next time I'd but a bit of ease in at the jacket and sleeve hems to make sure the lining doesn't cause any strange bunching.

So there you have it! One very longstanding project done. Gives me hope that I might one day finish the processor quilt! A final fun fact about these pictures is that I actually gave the SO the hair cut that he's sporting in the finished project photos here -- he hasn't had his hair cut since probably sometime in 2012, and so I started threatening that I'd cut it myself if he didn't go to the barber. This bluff completely backfired when he came home the other day with a hair clipper kit from Costco. I was afraid that this home hair cutting experiment was going to end up an utter disaster, but to my surprise it's not terrible. Looks like I'm now tailor and barber for my SO!


Sunday, April 7, 2013

The joys of sewing knits

I've made so many things over the past nine months or so that I haven't blogged about (including two tailored jackets!) that it's a bit ironic that this little project is the one that would bring me out of my blogging hiatus. I'm going to attribute it to the fact that by the time I finish a big project I'm usually a bit sick of it and I just want to wear it, not spend more time photographing it and chronicling its tortured process of coming into being. But in this case, the project was done so quickly that I still have enthusiasm left over to talk about it!

Anyways, my beloved local sewing workshop Emeline and Annabelle closed down about six months ago, and with it went my access to a serger (as well as my wonderful sewing sunday afternoons with my local sewists). So around Christmas, I decided to splurge and get myself a serger. Amazon.ca had this well-reviewed and inexpensive serger on sale for around $200 over the holidays, so I pulled the trigger.

Now I know that you can sew knits with a normal sewing machine, and I certainly have over the years, but sewing knits with the serger is a joy. After all, it's a machine custom built for the job, so there's no annoyance of taking ten minutes to sew a seam with your horribly slow faux overlock stitch (while running out of bobbin thread every other seam). It's super fast! My SO, who is accustomed to my overly complicated multi-week projects, was floored at how quickly I emerged from the sewing room with my first serger constructed dress.

Here's my latest serger project: 


A self drafted knit top based on Vogue 1141 (out of print). I first saw this pattern on Sigrid's blog, and I thought the pattern idea was genius: dead simple to make, but the shoulder pleat detail adds some interest to it and also makes it look a bit more like a cap sleeve than a tank top, making it a bit more work appropriate. The gathers at the bust practically disappear when sewn up in a knit, and allow for a bit of extra bust room that I wouldn't normally have in a t-shirt. I drafted the pattern off of a Burda knit shirt pattern, made a few adjustments after the first draft (mainly lowering the pleat detail a bit, it was too high up on the shoulder in my first version), and voila! This is certainly a pattern I'll sew again. I also used Sigrid's technique of using a serged binding strip to finish the neckline, with the slight modification that I omitted the interfacing and instead made the binding strip smaller than the neck/armhole openings to keep them from stretching out too much (I used strips that were 87% of the original seam length and eased the neckline into the binding). Evenly easing the openings into the binding strips was a bit time consuming, but the finished result is really nice.

The best part of this project is that the amount of fabric that I had was pretty much *exactly* enough for the shirt:


That's all that was left over, including the serger scraps. I have a terrible problem with not being able to get rid of leftover bits of fabric, even when I know they're not really big enough to actually make anything... the problems of being a fabric lover. This piece of fabric was a remnant that I bought at Britex fabrics while on a work trip late last year, and with some creative cutting layouts it was just enough for this pattern. If I were in one of those Project Runway "use all the fabric you bought" challenges, I'd be killing it right now!


Wednesday, August 1, 2012

Hobby mashup

 While the SO and I were on holidays this summer, we came across a few funny little stores that combine several of my hobbies: A shop that sold both sewing machines and bikes (above), and a bike store that was in a space formerly occupied by an aquarium store (below). I guess they decided to keep the old sign and just add their own store name!

I finished a cross-hobby project recently as well, a fabric cover for my bike seat.

The cover is not for saddle protection, but for pants protection: I made the unhappy discovery while biking the other day that the black leather saddle can leave stains on my clothes, especially if I bike too hard in the sweaty summer heat. Since I was on my way to to sewing store when this happened, I was able to sew up a quick solution before I biked home. Now that I have the pattern, I'll probably use it to sew up some waterproof seat covers as well when I find some appropriate fabric.

Thursday, July 26, 2012

A processor preview

You might think based on my radio silence here on the blog that there hasn't been much in the way of sewing, biking, or other hobbies in Biketopus land, but that's actually not the case. I've been getting a fair number of things done, including reaching a significant milestone on my processor quilt: I finally have the entire thing pieced! Finishing up the decorative stitching on those last few rows of red squares was not exactly scintillating sewing, but I managed to get it done by bringing them into the sewing shop on a Sunday so I could have some company while I stitched what felt like miles of straight lines.

Immediately after finishing piecing the top I made up the bed with it so I could see how it would look. It's not as wide as I somehow thought it would be (despite having supposedly carefully measured when I started it years ago), but it does look sufficiently long to cover up the SO's dangling feet. I was a little worried while making it that the bright colors would overwhelm our small bedroom, but I actually really like the way the quilt fills the room. I like peaceful decor in hotel bedrooms, but for my own house I prefer energetic bright colors.

 What remains now is to make a plan for actually quilting this quilt. I toyed with the idea of asking my sister to quilt it with a random meander pattern or even just quilting it with straight lines, but I just wasn't feeling that excited about going forward with a simple design. My SO pointed out that this thing has already been years in the making, so it doesn't really matter if it takes me another year to finish some ridiculously complicated quilting pattern. I'll probably end up very annoyed at myself halfway through, but right now I'm really looking forward to incorporating a bit more of the texture of the original photo with quilting. Where I have had an ongoing attack of the lazy lately, however, is in taking pictures. All I have for now are these cell phone pics, but I'll try to corral the SO into taking better pics sometime soon so that you can see the full quilt.

Tuesday, February 21, 2012

... and one big one.

I've also been working on the processor quilt once again. In early February I had a rather annoying stretch of sewing where the blouse pattern that I was drafting was just not working out, and I find that when I only have a spare hour to sew it's not very satisfying to spend that precious bit of time doing something like redrafting a sleeve. So, I turned back to the processor quilt, where at least every little bit does add visible progress towards finishing this massive project.

I've now finished enough so that you can see what the finished dimensions of the quilt will be, and it's big. So big, in fact, that I couldn't even lay the whole thing out on my sewing room floor! The quilt is actually much more finished than it looks, because most of the bottom part is a fairly easy to piece section (I think it's the cache of the chip?), and I already have some of that done. So, I mainly have one long strip that goes along the side and some of the cache to go.

Here's a detail shot of the top section of the quilt -- any guesses on how many pieces are in there? Maybe some day when I'm very, very bored I'll count it!

A few little projects...

The past two months have been quite travel heavy for me, with numerous little bounce trips to places on the east coast, and a longer trip to Portland to visit some dear friends of mine. Portland is a wonderful city to bike in, and after being snowed in here in Montreal for the last few months, it was a great feeling to be able to stretch my legs on the bike.

In between trips, I've been working on various little sewing projects, like this shirt for my Portland friends' son, who likes to play the ukelele. I was rummaging through my stash one evening when it dawned on me that this 3/4 yard of Hawaiian print fabric would be just the perfect amount for a ukelele playing outfit. The pattern is once again Oliver and S's sketchbook shirt pattern, this time in a 3T (I'm getting good at making these things now!).

I also made some baby bibs, including these two matching octopuses for another friend's twin baby girls (by the way, three babies and one toddler in the house for the week = exhaustion! I'm in my pajamas today recovering). I took these bibs over to Emiline & Annabelle to work on, a local sewing workshop where you can rent sewing time by the hour. It was fun to meet some other sewists and brainstorm with them about how I was going to cut these curly octopus tentacles out! I ended up signing up for a sewing membership, and will be going back in a few weeks for a lesson on how to use their serger.

And finally, an action shot of the Hawaiian shirt -- that's a smile that makes all those flat felled seams worthwhile!

IMG_0206164.jpg

Sunday, January 1, 2012

More Sorbettos

Sorbetto is the pattern that just keeps on giving! Like many out here in the sewing internets, I've made a bunch of these now. Here are a few more versions:

This one is for my mom, made out of a fabric that she purchased while on vacation. I'm not sure what exactly it is, but this was not a fun fabric to work with! It frayed like crazy, and as you can see from the photo it creases easily, too. Fabric issues aside, though, the top turned out quite well. I made it for her in a size 6, with an inverted pleat left open at the bottom to give it more of a swingy tunic look to it.

I made one for myself as well with an inverted pleat left open at the bottom, but I don't have a photo of it here. I do wear it, but it's not the best look on me -- having a pleat that opens up directly under my bustline makes me look like a pregnant lampshade. I also used the size 6 pattern as my base and did a large FBA. That helped with the shoulder and armhole fit, but it resulted in such a massive dart that it was impossible to sew without getting a pucker in it at the tip.

So, when I made this version, I divided the giant dart into two little darts (it's a little hard to see in this photo, though). They still look a little puckery, but I think that's more the fault of the fabric than the pattern this time. This final Sorbetto is madeout of a stretch silk charmeuse that I've had aging in my stash for a while. I wanted to make something pretty basic out of it, but to make it slightly more interesting I did the pleat and the binding out of the reverse matte side of the fabric (unfortunately this made the binding a total nightmare to sew because the slippery sides were facing inwards and the binding kept twisting like crazy!).

I think I'm probably about finished with this pattern -- despite tweaking the pattern multiple times, I still feel like the fit in the shoulders is not quite right for me. I had the feeling that the shoulders were too wide for me in my Rooibos muslin as well, so maybe the Colette patterns sloper has shoulders that are just a bit too broad for me?

Tuesday, December 13, 2011

More mini clothes

With Christmas getting ever closer, I've put my blazer project on hold for the moment so that I can finish up some presents in time. Last weekend I finished up the other pieces of the mini wardrobe that I'm making for my soon to be nephew. I made a long sleeved version of the Oliver and S pattern I used for the Hawaiian shirt, this time out of a remnant from a button down shirt that I made for myself (I still haven't blogged about that shirt, maybe it's time to get the SO to take some pictures of it!).

Little mini details like these cuffs are cute but certainly time consuming. I have to say, though, the instructions for stitching the sleeve slit were really good, and I'll use their technique again when I'm making my own shirts.

I ran into some problems with the shorts. Partway through making up the shorts, I realized that there was something amiss with the pattern. I went online to the Oliver and S forum and found that the pattern did indeed have errors, but unfortunately my pattern envelope was missing the errata slip that was supposed to come with it. Miserably, the pattern piece for the back of the shorts was missing seam allowances, and so there was not much I could do to salvage the pieces I had already cut. I ended up retracing, correcting and recutting the back pieces, and I only hope that this didn't use up too much fabric as I have the rest of this piece of fabric earmarked for another project.

In my frustrated state, I wrote Oliver and S to complain about having such an annoying error in a rather expensive pattern, and they wrote me back to offer me some patterns of my choice to try out free of charge. Nice of them! I'm glad that they offered me some "second chance" patterns, because I probably wouldn't have bought from them again after having tried this as my first pattern.

Errors aside, the instructions for this pattern are really thorough, and the pants have some nice design details like the faux fly front. I thought this was going to be time consuming to sew, but it wasn't at all. The trickiest part of sewing up these pants (after correcting the pattern, that is), was figuring out how long to cut the elastic for the waistband, since I have no idea at all how big a six month old's waist is!

Saturday, November 12, 2011

Mini clothes

This is my first attempt ever at sewing children's clothes, and I'm so pleased with how it turned out I had to post right away! My brother and his wife are expecting a boy this winter, and I thought I would make them a mini wardrobe as a present. I just got the pattern in the mail a few days ago, and I was so excited about it that I put aside two other projects that I had already traced out to make this up.

The pattern is Oliver and S' sketchbook shirt, which is basically a classic button down in mini form. The only difference between this shirt and an adult sized shirt is that the collar and stand are one piece, which is nice because a collar stand of this size would probably be just impossible to sew. I used this as an opportunity to work on my shirtmaking techniques, so even though this will probably be worn all of three times before the kid outgrows it, I finished all nicely -- flat felled seams on the side seams and sleeves, and edgestitching on the placket and collar. It looks just as nice from the inside as it does from the outside!

I'm planning to make the long sleeved version of this shirt in some leftover shirting material and the shorts up in some khaki cotton to complete the mini wardrobe.

Sunday, October 30, 2011

Two finished items in a week!

I have a bad habit of taking on very complicated sewing projects, which means that they tend to drag out forever and I start to lose interest in them because I've been simply staring at them for too long (processor quilt, anyone?). After my last complicated project (which I will post about soon), I decided to do something much, much simpler so I could have a finished garment to wear right away. I thought Vogue 1179 was a good candidate; it only has three pieces and wouldn't be heavy on the fitting since it's drapey. I also had the perfect fabric for it in my stash, a printed silk jersey that I bought ages ago from Fabric.com.

And here it is! It came together super quickly, even though I don't usually sew with knits and there were a few things I had to figure out here and there. I don't have a serger, and I'm still a little bit intimidated by sewing with knits on my regular machine. I ended up stabilizing the neckline with some ribbon to keep it from growing, and I did the armholes with clear elastic as the pattern suggests. The armholes are a bit high on this pattern for me. I took an extra half inch or so off of the armhole at the bottom, but it still feels a bit snug after installing the elastic.

For the seams I used a narrow zigzag, and that seemed to work fine since the jersey didn't have a lot of stretch in the length. I wasn't sure what I should do for the hem. I thought about using a twin needle, but I haven't been all that happy with my twin needle attempts. I'm still getting the "tunneling" effect no matter how much I bump the tension down, and the resulting stitch is not all that stretchy. I hemmed a RTW shirt with my twin needle recently, but it snapped after a few wears because the stitching just didn't have enough stretch. So for this dress, I stabilized the hemline with some stretch lace on the inside before sewing it. It makes it less stretchy (and therefore less comfortable), but also less likely to break.

I always end up smiling too much when the SO takes my picture. This is me trying to make a serious face, and ending up just looking goofy!

After my success with the dress, I immediately whipped up a tunic length version in another knit that I had in my stash. It looks great with skinny jeans and is very comfortable. I think I'll wear this outfit tomorrow on the plane as the SO and I set off for Cleveland. Bon voyage!

Sunday, October 16, 2011

More adventures in mass cooking

It seems the preserving season is not over for us yet! We visited the St Jacobs Farmers' Market with my parents last weekend, and it was overflowing with good produce deals (and people, since it was the long weekend). We went intending to get some apples, which were there in abundance. We bought two big bags of mixed apples for sauce making for six dollars a bag. Here's one bag, with a paint can for reference:

We've now made two batches of sauce, one batch of apple pie filling, and one apple pie. We bought a food mill while we were making all of our tomato sauce, and the food mill is fabulous for making apple sauce. Just chop up the apples, cook until mushy, and then take out all the seeds, stems and skins with the food mill! A few random little bits of things still seem to get through, but I'd say it's worth it to not have to peel and core all those apples.

The apples weren't the only cheap items at the market, and we ended up coming home with a giant bag of carrots as well (about 30 pounds for six bucks). A few stands had similar quantities of peppers for sale, and if I'd been able to figure out what to do with that many peppers I would have bought those as well. We're still working on using up those carrots. After making giant batches of Zeus' thai carrot soup and a morrocan stew, we're stumped. Anyone have any recipes that call for about ten pounds of carrots?

Monday, September 26, 2011

Introducing my new sewing room!

This is a post that I've been waiting to do for a while! Like many other sewing obsessed people out there, I've always wanted to have a space of my own for sewing and crafting projects. In the past I've had my sewing machine set up on the kitchen table, and then graduated to a little desk in the corner of the bedroom, but the mess has always managed to spill out and take up more of the house than was really desirable. Now I finally have a room of my own, custom designed for sewing. I also have enough storage space that I hope I'll have at least a fighting chance of staying organized, and a door to close if I don't!

Our apartment in Montreal is a three bedroom (or a 5 1/2, in Montreal speak), which sounds quite large (and it is a lot bigger than other places we've lived in, to be fair), but the bedrooms are pretty tiny. The room that we use as our bedroom is barely large enough to hold our double bed, let alone a dresser and clothes. After mulling over what to do about the bedroom setup, it dawned on me that there's no law saying that I have to get dressed in the bedroom -- in fact, it makes quite a lot of sense to keep my clothes along with all my sewing stuff. So, the room is actually a sewing room/dressing room, and now my dresser is right across the hallway from the laundry and in the same room as the ironing board.

I repainted our old dresser to match my new color scheme, and made two sets of curtains. Since the windows are just above street level, I wanted one set of curtains that would stay permanently closed for privacy, and then some sheers for decoration. I finally managed to make peace with my rolled hem foot while making these curtains. They were so long that there was no way I wanted to go over each seam twice to do the rolled hem manually, so I just sucked it up and messed around with the foot for a while. I watched a lot of internet videos to try to help me along, but really, I think the rolled hem foot is all about tacit knowledge. And after sewing 30 or so feet of curtain edges, I'm finally getting a feel for how to hold the fabric so it feeds through nicely.

On the dressing side of the room, my SO installed some wall mounted clothes bars for shirts and skirts. I like the idea of having some clothes out in the open -- I can hang things out there that have a tendency to get lost in the back of my closet to encourage myself to wear them, and it's also nice to have some things that I've made on display in the room. I hung a few pegs on the wall for works-in-progress or hanging up pajamas or so, but in reality I tend to dump them on the dressing chair. The chair was a great find that I bought off my neighbors who have a scrap metal collecting business. They were about to dismantle a set of these excellent chairs before I ran outside and saved them.

On the sewing side of the room, I bought some of these Ikea shelves to use a cutting table/storage area. My most excellent sister bought two of these shelves for her sewing room, and when I saw them at her place I couldn't believe I'd never thought of turning them on their sides and using them as a table. The two shelves together comfortably fit my cutting mat and ironing board, and I hung some baskets on the wall so I can have my rotary cutters and chalk markers nearby.

I took allllll of my fabric out of storage and folded it up neatly so that it could be stored in the Ikea shelves. The SO has a really great picture of me surrounded by fabric mid-organizing, looking totally overwhelmed. With the notable exception of some fabric shopping done while on vacation in Paris, I'm still refraining from buying new fabric until I use up at least half of my stash. I'm hoping that keeping it out in the open will motivate me to sew! I also made some storage bins for scraps and interfacing/random notions. The bins turned out really well, but they were truly more complicated than they needed to be (what with the binding around the edges and all), and I was really annoyed with myself for spending so much time making storage bins by the time I was halfway done. One little idea that I'm really pleased with was painting the front of the drawers of an organizer with chalkboard paint. Now they can be relabeled easily if I ever decide to store something else in there.


And finally, I really lucked out with finding this little desk for my sewing machine at a garage sale in my neighborhood. It's a really tiny desk -- my chair just barely fits under it, and that's after we added little legs to the bottom to raise the height a bit. The person I bought it from said that she thought it was from the 50s or 60s, and probably held a piece of infrequently used office equipment.

So there you have it -- my new sewing room. Now that I'm finished painting and organizing, perhaps I'll actually be able to get some sewing done!

Tuesday, September 13, 2011

It's a canning frenzy over here

The jetlag from our recent trip to Europe had us up early in the morning for our first few days back, and what better to do with that extra morning energy than go to the market? Early September seems to be tomato season around here, and there were giant bins of tomatoes at the market. We picked up a bushel of roma tomoates (52 pounds!) for 16 bucks and felt quite pleased about it, but as the SO was walking them home on his bike a guy stopped him to say you could get a bushel of tomatoes for ten dollars elsewhere. So cheap! I don't feel sad about paying 16 bucks for these lovely tomatoes at all, especially considering how much we pay for sad and lifeless tomatoes here in Canada in the winter.

Tomato based things are pretty labor intensive to can. We did two batches of tomato sauce over two days, and it takes a good afternoon for the sauce to slowly simmer and reduce enough until it's thick enough to can. We also made ketchup (a looooong time to reduce for that), and salsa, which didn't have to cook very long but involved a lot of prep work (scalding the tomatoes to remove the skins, and then de-seeding them).

But, those cans of salsa look pretty awesome, don't they?

We also ended up with a lot of cucumbers this week from a friend's CSA share. The SO, who is extremely picky about both mustard and pickles, found a recipe online for mustard pickles that appealed to him, and he tried these out. Unfortunately, he used a bit more (actually, a lot more!) horseradish than the recipe called for, so these may end up being pickles of death. We opted to keep them in the fridge rather than processing them, and every time I open the fridge now I get a whiff of horseradish.

After a long weekend of canning, my favorite part is labeling the lids and arranging all the nice jars of stuff in the cupboards. I'm a bit of a hoarder and find it very comforting to have a stockpile of stuff around, so the sight of this cupboard full of sauces and jams and pickles makes me very happy. I'm not sure that it's quite enough to last us through the long Montreal winter, but it's a good start.